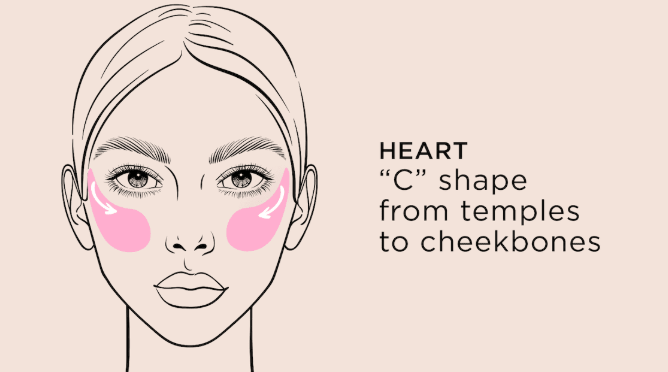
High Placement for a Lifting Effect Traditional blush placement on the apples of the cheeks can drag the face downward, especially as skin loses elasticity. Placing blush higher on the cheekbones, just below the outer corner of the eye, creates an optical lift. This position draws the eye upward and outward, mimicking the natural flush that occurs after exercise. The highest point of blush should align with the temple, not the nose. Blending blush upward toward the hairline, never downward toward the mouth, reinforces the lifting effect. Using a cream blush applied with fingers or a stippling brush gives the most natural gradient. Powder blush works as well but requires more blending to avoid harsh lines. This technique works for all face shapes but benefits round or square faces most. For long faces, placing blush slightly lower and more horizontal balances length. No blush placement changes bone structure or reverses sagging skin. The lifting effect is visual and temporary, lasting only as long as the makeup stays on. Signs of correct high placement include cheeks that look higher when smiling and a face that appears more rested without additional products.
Color Selection for Different Undertones Blush color affects the lifting illusion as much as placement. Cool undertones (pink, blue, or red veins) look best in cool pink, berry, or mauve blushes. These shades harmonize with natural coloring and create a believable flush. Warm undertones (yellow, peach, or gold veins) suit peach, coral, apricot, or terracotta blushes. Warm blushes on warm skin look like a natural tan flush rather than a separate color on top of the skin. Neutral undertones can wear both, but dusty rose and soft tawny shades bridge the gap most effectively. The wrong undertone makes blush look like a stripe of color rather than a natural glow. Testing blush by swatching on the cheek in natural light, not on the hand, gives the most accurate assessment. For darker skin tones, deeper berry, brick, or plum shades show up without looking ashy. Very fair skin needs sheer, buildable formulas to avoid clownish appearance. No blush color changes the structure of the face, but the right undertone makes high placement look seamless rather than obvious. Signs of correct color include blush that blends into skin without a visible edge and a flush that looks like it comes from within.
Cream vs Powder for Different Skin Types Cream blush melts into skin, creating a dewy, skin-like finish that looks natural from every angle. It works best for normal to dry skin because the emollient base does not cling to dry patches. Applying cream blush with fingers warms the product, making it spread evenly. Powder blush sits on top of skin, providing a matte or satin finish that lasts longer on oily skin. Oily skin breaks down cream blush within two to four hours, causing patchiness. Powder blush on oily skin lasts six to eight hours without fading. Combination skin can use cream blush on the cheeks and powder blush on the nose or chin where oil is more active. Setting cream blush with a matching powder blush extends wear for all skin types. Applying powder blush with a fluffy, tapered brush in light layers prevents the heavy look that ages the face. No blush formula lasts through swimming, sweating, or rubbing regardless of claims. Touch-ups may be needed after four to six hours. Signs that the wrong formula was chosen include cream blush disappearing within two hours on oily skin or powder blush looking cakey and dry on flaky patches.